Showing posts with label pattern. Show all posts

Monday, August 7, 2017

Baby Sunburst Baby Blanket (with Square Pattern)

Hello, hello, hello!

Although I really love making baby blankets (and that's why I'd been making lots of them for sale recently), my favorite blankets are those that I make for friends, when a baby is on the way :)


When my friend was expecting her second baby (a little sister for the 2-year old boy), I asked her, what kind of blanket she'd like. She said that - since the little one would mostly wear her brother's neutral clothes in the beginning - she wanted a typical "girlie" blanket with girlie colors, flowers and stuff. So, what do you think? Is that a "girlie" blanket or not? :)


When my friend mentioned flowers, I searched Pinterest high and low for a pattern that I liked. And although I've found lots and lots of beautiful flower squares, somehow I couldn't make up my mind. Most flower squares are 3-dimensional, and although they are truly beautiful, in my mind I had the idea of a "flat" flower. Something like the traditional Sunburst Granny Square (I think the original designer is Priscilla Hewitt, please correct me, if I'm wrong).


Actually the Sunburst Granny Square would have been the perfect fit, but I thought it was a little bit too big: it's great for bigger blankets, but for baby blankets I somehow like to work with smaller squares. So I've tried to figure out a way to make a Sunburst Square, that's just a little bit smaller than the original.
Here you see the comparison, on the right is the original Sunburst Square (with 16 petals), and on the left is my adaption (a Sunburst with 12 petals):


Using the smaller version, I could join 9x9=81 squares to make a cute little blanket. I connected them with the last round in a continuous join-as-you-go method. Of course I've worked with Stylecraft Special DK again and used the following colors: Cream (for the background), Lemon, Apricot, Candy Floss, Fondant, and Sherbet.


Don't get me wrong - the original Sunburst Granny Square is perfect as it is, but if you ever want to make a smaller one, here's my version:

Baby Sunburst Square

based on the Sunburst Square by Priscilla Hewitt

Pattern Notes:
For this pattern I use US crochet terms. Starting with a "magic ring" (or sliding loop) we’ll need the following basic stitches: chain stitch (ch), slip stitch (sl st), single crochet (sc), half double crochet (hdc), double crochet (dc), and some
Special Stitches:
Puff-Stitch: *Yarn over (yo), insert hook into indicated stitch and pull up a loop to the level of your work* 3 times, yo and pull through all 7 loops on hook.
Double Crochet 4-together (dc-4-tog): *Yarn over (yo), insert hook into indicated space and pull up a loop, yo and pull through two loops* 4 times, yo and pull through all 5 loops on hook.


Round 1:
Start with a magic ring, ch1, and work 12 sc inside the ring. Join with a sl st to first sc and fasten off. (12sc) (The sl st does NOT count as a stitch!)
Round 2:
Join a new color with a sl st to any sc, ch-1 loosely (doesn't count as a stitch), and work (puff stitch, ch-1) in every sc around. Join with a sl st to top of first puff stitch and fasten off. (12 puff stitches)
(You can also start this round with a standing puff stitch instead of the loose chain)
Round 3:
Join a new color with a sl st to any ch-1-space, ch-1 loosely (doesn't count as a stitch), and work (dc-4-tog, ch-2) in every ch-1 space around. Join with a sl st to top of first dc-4-tog and fasten off. (12 dc-4-clusters)
(You can also start this round with a standing dc-4-tog instead of the loose chain)
Round 4:
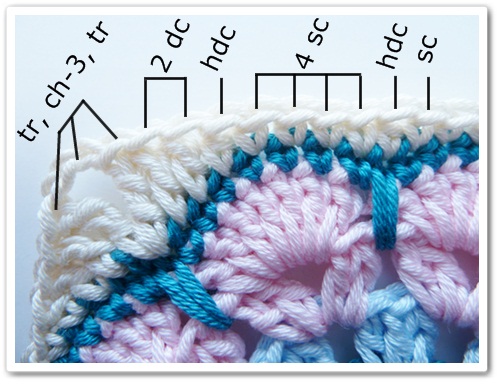
Join a new color with a sl st to any ch-2 space, ch-2 (counts as first hdc) and 2 more hdc into the same space, ch-1. *(3dc, ch-2, 3dc, ch-1) into the next space, (3hdc, ch-1) into each of the next two spaces. Repeat from * around until you reach the beginning of the round (omitting the last hdc-group) and join with a sl st to top of beginning ch-2. Fasten off and weave in all ends.

If you want to join the squares with a continuous join-as-you-go method like I did, you only work the first three rounds and then connect the circles in one continuous process using the 4th round of the pattern (i.e. with hdc's on the sides and dc's in the corner) with the ch-1 spaces and corners as joining spots.

I hope you've enjoyed this pattern! :)


Monday, June 19, 2017

c2c-Pattern: Baby Lion


Pattern: Made in K-Town by Barbara

Please respect my rights as designer:
do not sell, share, translate, or publish any parts of this pattern (including pictures)
online or elsewhere without my permission.
Do not claim this pattern as your own.
Based on a free lion clipart, this graphic pattern
was processed, edited and simplified with the online-tool Stitch Fiddle.
Feel free to sell the finished items you’ve made from my pattern!
If you do, a link-back to my blog www.made-in-k-town.blogspot.de would be great.
Thank you!


Some General Notes:

To use this pattern, you should be familiar with the c2c-technique. A good tutorial with instruction videos and further ressources can be found on http://thecrochetcrowd.com/corner-corner-graphghans-beginners-tutorial/

The pattern does not include instructions for the border.

The pattern contains a chart and also row-by-row instructions for the color-sequence in table format. To keep the structure clear, I offer this pattern as a 3 pages PDF.

More pattern notes are included in the PDF.

I hope you enjoy this pattern!


Monday, May 15, 2017

Starlight Baby Blanket Pattern


Pattern: Made in K-Town by Barbara

The stitch-pattern is based on the Fantasy Shawl, a free vintage pattern.
The adaption as a multi-colored baby blanket including border is my original design.
Please respect my rights as designer:
do not sell, share, translate, or publish any parts of this pattern (including pictures)
online or elsewhere without my permission.
Do not claim this pattern as your own.
Feel free to sell the finished items you’ve made from my pattern!
If you do, a link-back to my blog www.made-in-k-town.blogspot.de would be great.
Thank you!

Material and Size:
I’ve worked with Stylecraft Special DK in the following colors: Cream, Lemon, Apricot, Clematis, Sherbet, and Spring Green. Using a 4.0mm hook, my blanket measures 85cmx70cm (33.5”x27.5”). The pattern is easily adjustable to any desired size, so you can use your favorite yarn and hook without problems.

Pattern Notes and Special Stitches:
For this pattern I use US crochet terms. From the basic stitches we’ll only need the chain stitch (ch), slip stitch (sl st) and the double crochet (dc), plus some Special Stitches:
Star Stitch: will be explained in the pattern
Double crochet 2 together (dc-2-tog): yarn over (yo), insert hook into first indicated stitch, yo and pull up a loop, yo and pull through 2 loops on hook, yo and insert hook into the next indicated stitch, yo and pull up a loop, yo and pull through 2 loops on hook, yo and pull through the remaining loops on hook.
Double crochet 3 together (dc-3-tog): yo and insert hook into first indicated stitch, yo and pull up a loop, yo and pull through 2 loops on hook, *yo and insert hook into the next indicated stitch, yo and pull up a loop, yo and pull through 2 loops on hook*, repeat from * one more time, yo and pull through the remaining loops on hook.
crossed double crochet (crossed dc): will be explained in the pattern
double single crochet (dsc), sometimes also known as “mini bean stitch”: insert hook into indicated stitch or space, yo, pull up a loop (2 loops on hook), yo, insert hook into the same space again, yo, pull up a loop (4 loops on hook), yo, pull through all 4 loops on your hook.

How to use and change colors:
I’ve worked the first two rows, every following star-stitch row (repetitions of row 2), and the last row (the last repetition of row 3) in Cream (the main color) and every dc-row (repetitions of row 3), except for the last row, in a different color. You could also do it the other way round, i.e. working the star-stitch rows in different colors, and the dc-rows in the main color. When changing colors at the end of the row, you already use the new color to finish the stitch, i.e. at the end of the star-stitch row, you already pull through the five loops on your hook with the new color and work the following ch in the new color as well. At the end of a dc row, you finish the dc (pull through two loops) with the new color. When you drop a color, cut the thread and leave a tail – we’ll work over the tails when we come to the border. (Tip: before I work over the tails, I knot the tails together that are right next to each other)


Note:
Although the pattern is pretty easy to do, I had some troubles explaining it in words (especially the border), so I made an extra swatch and took pictures of the progress to help you with my instructions. You can click on the pictures to enlarge them.

Pattern:
Row 1
Ch-131 (or any odd number of chains as needed for desired width), dc in 5th ch from hook, *ch-1, skip 1 ch, dc in the next ch*, repeat from * across, working the last dc into the first ch from beginning, ch-2 and turn.
Row 2
Note: the expression “pull up loop (pull up lp)” means: insert your hook into indicated stitch or space, yarn over (yo), and pull through the stitch/space.
Pull up lp in second ch from hook, pull up lp in first dc, pull up loop in first ch-1 space, pull up loop in next dc, yarn over (yo) and pull through all 5 loops on hook, ch-1 (The chain is often referred to as the “eye of the star”). *Pull up lp in the ch just made, pull up lp in the same dc, pull up lp in the next ch-1 space, pull up lp in the next dc, yo and pull through all 5 lps on hook, ch-1 (star-stitch made)*, repeat from * across, working your last star-stitch like this: pull up lp in the ch just made, pull up lp in the same dc (that’s the last regular dc in the row), pull up lp under the next ch (= turning chains from the start of the last row), pull up lp in the next ch (that’s the next of the turning chains, see picture), yo with a new color and pull through all 5 lps on hook, ch-1 to close the star stitch, ch-3 and turn.

Row 3
Dc into the eye of the next star-stitch, *ch-1, dc into the eye of the next star-stitch*, repeat from * across, working your last dc into the turning chain (the one, where you’ve already pulled up a loop in the previous row, see picture). Finish the last dc (i.e. pull through 2 lps) with the main color, ch-2, and turn.

Row 4 - end:
Repeat rows 2 and 3 until your blanket has the desired height. For the last repetition of row 3, use your main color.

A word about turning chains: experienced crocheters might wonder, why I started row 1 with a dc in the 5th chain from the hook instead of the 6th, and why I use 3 turning chains instead of 4 at the end of row 2. Actually, you would expect 4 turning chains, to count as the dc and ch-1 we need, and the original pattern for the Fantasy Shawl does indeed suggest 4 turning chains. However, I’ve tried it like this, and found that after a few rows the edges started to widen and make a bend. Working with 3 turning chains like I do here, we end up with nice, straight edges. I guess you just have to trust me here :)

Border:

Before we start with the border, you might want to pick your favorite side of the blanket. The sides look a bit different, so you start the border with your favorite side facing you. I’ve picked the side with the right side of the star-stitches facing (right picture)


Rnd 1:
The first row of the border is a round of dc with 3 dc into the corner-stitches. Make it like this:

Top Edge:
Continue with (or attach) your main color in the right corner, ch-3 (counts as dc) and 2 more dc into the same stitch (that’s your first corner), then make a dc in every ch-1 space and in every dc across. For the next round to work out, it’s important that we have an even number of dc on the edges (not counting the 3 corner dc on both ends), so you have two options: either you squeeze in an additional dc somewhere, or you work a dc-2-tog over a ch-1 space and the following dc (that is what I did, see picture). Make 3 dc into the corner-stitch.
Side Edge 1:
While working down the sides, work your stitches over the tails of the color changes. Place your stitches into the spaces of the dc-rows and into the side of the star-stitches. This is either the eye of the star, or the first turning chain that marked the beginning of the star-stitch row, depending on which side you’re working down first. It will be the other way round, when you’re working the second side.


Work 2 dc into the first gap, then a dc-3-tog over the same gap, the next star stitch-row and the next gap. *2 dc into the same gap, dc-3-tog over the same gap, the star stitch, and the next gap*, repeat from * across, until the last gap and make your 2 dc in there. Now count your stitches (without the 3 corner dc): if you’ve got an odd number of stitches, make one more dc into the same gap and finish the edge with 3dc into the corner stitch. If you’ve got an even number of stitches, you can work your 3 corner dc right away. (note: with an even number of star-stitch rows, the stitch-count should work out without adjustments: in my example I had four star-stitch rows and an even number of stitches on the edge, see picture)
Bottom Edge:
Make a dc in every ch-1 space and in every dc across (actually you’re working your stitches not into the dc, but into the chain where you’ve made your first-row dc of course). Adjust your stitch-count like you did for the top edge (i.e. by working a dc-increase or a dc-2-tog), and work your 3 dc into the corner stitch.

Side Edge 2:
Same as Side Edge 1, close the round with a slip stitch to beginning ch-3 of the first corner. Don’t turn.


(In case you wonder, why I’m working all those dc-3-togs along the sides: I wanted to make a nice dense edge to cover the loose tails completely, but without increasing the stitch count. Alternatively, you could just make 2 dc into each gap and 1 dc into the side of the star-stitch row, if it doesn’t bother you that the tails might be showing.)

Rnd 2: 
The second border round is worked with crossed dc. If you’ve followed the pattern exactly as described so far, you should be at the ch-3 that counted as your first of 3 corner dc, so we can start with the new corner right away:

Ch-4 (counts as dc and ch-1), and - working behind these turning chains – make a dc into the dc before. That’s your first crossed dc. Dc into the next “free” dc (=the second corner dc), ch-1, crossed dc – working behind the stitch just made – into the the stitch before (=first corner stitch =top of 3 turning chains). Dc into the next free dc (=the third corner dc), ch-1, crossed dc into the stitch before (=second corner dc). Dc into next free dc (= first dc of the top edge), ch-1, crossed dc into the stitch before (=third corner dc). Now that we’ve made our first corner with 2 dc (regular or crossed) coming out of each corner dc of the previous round (see picture), we can go on with the edge: *skip the next free dc, dc into the next dc, ch-1, crossed dc into the skipped dc*, repeat across until you reach the next corner, then continue as described for the first corner, i.e. not skipping stitches between the dc, but working two dc (regular or crossed) into each of the 3 corner dc. Then go on with the crossed dc along the straight edge again. Continue this way until the end of the round and join with a sl st to third ch of turning chains. Do not turn.


Maybe this sketch can help, too:


Rnd 3:
We’re almost there! Sl st into next ch-1-space, ch-1 (doesn’t count as a stitch), dsc into same space, ch-1. For the dsc – or “mini-bean-stitch” – see pattern notes above. (Dsc, ch-1) into the next space, (dsc, ch-2, dsc) into the next space – this is your corner, see the following sketch:


Unfortunately the sketch looks pretty crooked (sorry, I’m not that good at drawing graphic patterns), but in reality the corner ch-1-space (marked light green in the sketch), is right in the corner, right above the middle corner dc of the first border round, you can see it better in the next picture:


Continue with (dsc, ch-1) in every ch-1 space around, with (dsc, ch-2, dsc) in the according spaces of the remaining corners. Join with a sl st to first dc, fasten off, and weave in all the ends. And that's it! :)


I hope that the instructions were not too confusing
and that you’ve enjoyed this pattern!

As usual, you can share your finished project and notes on Ravelry.


Friday, March 31, 2017

Spring Bubbles Mandala


Pattern: Made in K-Town by Barbara

Please respect my rights as designer: do not sell, share, translate, or publish any parts of this pattern (including pictures) online or elsewhere without my permission.
Do not claim this pattern as your own.
Feel free to sell the finished items you’ve made from my pattern!
If you do, a link-back to my blog www.made-in-k-town.blogspot.de would be great. Thank you!


Material:
All you need for this Mandala are small amounts of your favorite yarn and the according hook. For this Tutorial I worked with 4 different colors of cotton yarn (Catania by Schachenmayr) and a 2.5mm hook. My Mandala measures 13,5 cm in diameter (5.3") but the size will vary depending on the yarn you use, so gauge is not important.

Pattern Notes and Special Stitches:
For this pattern I use US crochet terms. Starting with a magic ring, we’ll need the following stitches: chain stitch (ch), slip stitch (slst), single crochet (sc), double crochet (dc), treble crochet (tr) and some
Special Stitches:
Crossed Double Crochet (crossed dc):  yarn over (yo), and – working over the last dc you’ve just made – insert hook into the stitch before the dc you’ve just made and finish dc as usual. (Together with a dc and ch-1, the crossed dc form a kind of “crossed V-stitch”, you could say).
Surface Stitches: having a loop on your hook and holding the yarn behind your work, insert hook in between the next two dc’s, yo, pull loop through the gap and through the loop on your hook. Basically, it’s just working slip stitches around the body of the dc.
Double Single Crochet (dsc): insert your hook into the indicated stitch or space, yo, pull through space (2 loops on hook), yo, insert hook into the same space again, yo, pull through space (4 loops on hook), yo, pull through all 4 loops on your hook.
Some of the explanations in this pattern might sound a little bit difficult, but I promise you – with a hook in your hand, it’s all easy-peasy :) If you are an absolute beginner or don’t feel comfortable with the special stitches, I also give you some alternative (easier) solutions for the according rounds!
Please note:
I usually start all my rounds with a standing stitch (i.e. the recquired stitch right away) instead of starting with beginning chains. The written pattern however is with beginning chains, so don’t worry if the pictures don’t match your work exactly! It’s up to you, if you want to start a round with standing stitches or beginning chains.

Rnd 1
Start with a magic ring, ch-4 (counts as dc and ch-1), work (dc, ch-1) 15x into the ring, join with a slst to third ch of your beginning ch’s, fasten off. (16 dc, 16 ch-1 gaps)
Don’t pull the magic ring too tight yet!

Rnd 2
Attach another color with a slst to any ch-1 space, ch-1, sc in same space, ch-1, *sc in the next gap, ch-1*, repeat from * around and join with a slst to first sc, fasten off. (16 sc, 16 ch-1 gaps)
  
Rnd 3
Attach another color with a sl st to any ch-1 space, ch-4 (counts as dc and ch-1), crossed dc into the ch-1 gap before the gap where you’ve started, *dc into the next free gap, ch-1, crossed dc into the (already “taken”) gap before the stitch you’ve just made* repeat from * around and join with a slst to third ch of your beginning ch’s, fasten off. (16 crossed V-Stitches, 16 ch-1 gaps)
For the crossed dc see “Special Stitches” in the pattern notes above.
For the last dc/crossed dc repetition, place the dc into the space where you’ve already placed your first crossed dc at the beginning of the round – so actually this is not a “free” gap.
You should now have two dc’s (one regular, one crossed) coming out of each ch-1 gap of round 2, right?
You can now pull the magic ring tight, if you haven’t already.

Easy Alternative: just work regular V-Stitches (i.e. dc, ch-1, dc) in every ch-1 gap around.

Rnd 4
Attach another color with a slst to any ch-1 space, ch-3 (counts as dc) and 2 more dc into the same space, *3 dc into the next space*, repeat from * around and join with a slst to beginning ch-3, fasten off. (48 dc, no spaces)


Rnd 5
Holding the yarn at the back of your work, insert hook in between any two dc’s of the previous round, yo, pull loop through the gap and work surface stitches around. To finish the round, work the last surface stitch in the gap where you started, cut thread, and finish off. Use your hook or a needle to pull the loose end through to the back again, tie the two ends together and weave them in.
For the surface stitches see “Special Stitches” in the pattern notes above.
You can also add this round in the end when you're finished with the rest - this is a suggestion from my sister who tested this pattern for me. Danke Sabine! :) 

Easy Alternative: just skip this round, it’s just for decoration and won’t change the stitch count.

Rnd 6
Turn your work, so that the left side is facing you! Attach another color with a slst to any dc of rnd 4. Ch-1, sc in the same stitch, tr in the next stitch, *sc in the next stitch, tr in the next stitch* repeat from * around and join with a slst to first sc, fasten off and turn again. (24 sc/tr pairs)
Now you should see the “bubbles” (or bobbles, but I like bubbles better *gg*), that have formed by working the sc/tr combinations.
Make sure you don’t accidently grab the surfaces stitches of round 5 while working this round! (I mention that, because it happened to me before)
  
Rnd 7
With the right side facing you again, attach another color with a slst to any sc of the previous round (those are the smaller looking, tighter stitches of the two). Ch-1, sc in the same stitch, ch-3, skip the tr, *sc in the next sc, ch-3, skip the tr*, repeat from * around and join with a slst to first sc, fasten off. (24 sc, 24 ch-3 gaps)

Rnd 8
Attach another color with a slst to any ch-3 space, ch-3 (counts as dc) and 2 more dc into the same space, *3 dc into the next space*, repeat from * around and join with a slst to beginning ch-3, fasten off. (72 dc, no spaces)

Rnd 9
Attach another color with a slst to any dc, ch-4 (counts as dc and ch-1), crossed dc into the dc before the stitch where you’ve started, *skip the next free dc, dc into the next dc, ch-1, crossed dc into the skipped dc before the stitch you’ve just made* repeat from * around and join with a slst to third ch of your beginning ch’s, fasten off. (36 crossed V-Stitches, 36 ch-1 gaps)
For the crossed dc see “Special Stitches” in the pattern notes above. Notice the difference to round 3? This time you’ve only got one dc (regular or crossed) coming out of each stitch of the previous round. The crossed V-Stitches don’t “touch” at the base like in round 3.

Easy Alternative:  just work regular V-Stitches (i.e. dc, ch-1, dc) in every second dc around, i.e. skip one dc between the V-Stitches.

Rnd 10
Attach another color with a slst to any ch-1 gap of the previous round, ch-1, 2 double sc (dsc) in the same gap, ch-1, *2 dsc in the next gap, ch-1*, repeat from * around and join with a slst to first dsc, fasten off and weave in all the ends. (36x2 dsc, 36 ch-1 spaces)
For the double sc see “Special Stitches” in the pattern notes above.

Easy Alternative: instead of double sc’s use regular sc’s and work (2sc, ch-1) in every ch-1 gap around. But I really hope you try this fun and easy stitch, though – it makes for a nice, dense finish!

I hope you've enjoyed making this easy new Mandala. If you've got any questions or find errors in this pattern, please let me know!

edit: after I had taken all the pictures and written down the pattern, I noticed that crossed dc's are usually worked behind the first dc and not over the dc, like I did here. Maybe you want to try both version and see which alternative you like better! (I go with the behind-cross next time *gg*)


You can also share your Spring Bubbles Mandala in the Project Gallery on Ravelry!


Friday, March 17, 2017

Easter Bunny Ornaments


Pattern: Made in K-Town by Barbara

This pattern is inspired by a picture I’ve seen on Pinterest.
Unfortunately there was no pattern or source attached to the Pin,
so I’ve designed this pattern myself, based on what I saw on the picture.
If you happen to be the original designer, please let me know,
so I can give you credit for the idea.


Material:
For this pattern I’ve worked with small amounts of cotton yarn (Rico essentials cotton dk) and a slightly thinner hook than it is suggested for the yarn (suggestion is 3-4, I've worked with a 2.5mm hook). I highly recommend that you use cotton yarn as well, so that the ornaments – and mainly the ears – keep their shape. You’ll also need a ring (crochet ring or key ring). Mine measures 36 mm (1,4”) in diameter, but the pattern is easy to adjust to any other kind of yarn or ring-size.

Stitches:
For this pattern I use US crochet terms. We’ll need the following stitches: chain stitch (ch), slip stitch (slst), single crochet (sc), and half double crochet (hdc).

First, let’s start with

The Ring:


1st Round
Attach yarn with a slst to your ring, ch-1, 1 sc into the ring, ch-20, slst in the first ch to form a big loop. 3 sc into the ring, ch-20, slst in the first ch to make the second ear. 30 sc into the ring, close the round with a slst to where you started.
2nd Round
Slst in the first sc, slst in every back bump of each of the next 20 ch, slst in the next 3 sc, slst in every back bump of each of the next 20 ch, slst in the next 30 sc. Close the round with a slst to the first slst of this round.
Cut thread, fasten off, and weave in the ends.

Try to work the 20ch-loops a littler looser than you normally would, that makes it easier to work into the back bumps later! Depending on the yarn you use and the size of your ring, you might want to adjust the number of chains worked for the ears and the number of stitches you have to work into the ring: The ring should have enough stitches to be covered (i.e. "invisible") completely, but not too many so it doesn't ruffle. For the ears, adjust the number of chains according to the desired size of the bunny ears.

Next, we’re gonna make

The Bow:


For the bow, start with a magic ring and a longer tail than usual (about the length you want for the hanger), ch1, 3 hdc, ch1, slst into the ring. Then once again: ch1, 3 hdc, ch1, slst into the ring. Cut the thread (about as long as the other end) and fasten off. Wrap the two ends (in two different directions) tightly around the middle of the bow once or twice, and secure with a knot on the back.

If you want to make a bigger bow, you can also work 2x *ch2, 3dc, ch2, slst into the ring*

And now, we’re gonna bring it all together:


Position the bow (I like to cover the beginning, which is sometimes not that neat), and - using a tapestry needle - pull the ends to the backside of your work, using the spaces left and right to the according stitch (what I want to say is: don't use the same gap for both ends). Make a knot to hold the bow in place. With the tapestry needle pull the two ends behind the stitches up to the middle sc between the ears. Tie the ends together at the desired length of your hanger.

And that's it! :)


I hope you've enjoyed making this quick and easy ornament. If you've got any questions or find errors in this pattern, please let me know! You can also share your easter bunnies in the Project Gallery on Ravelry!


Friday, February 8, 2013

African Flower Square Tutorial


Pattern: Made in K-Town by Barbara

inspired by the African Flower Hexagon by Lounette Fourie & Anita Rossouw
 
Please respect my rights as designer: do not sell, share, translate, or publish any parts of my patterns (including pictures) online or elsewhere without my permission. Do not claim this pattern as your own. Feel free to sell the finished items you’ve made from my pattern! If you do, a link-back to my blog www.made-in-k-town.blogspot.de would be great. Thank you!


Material:

For my square I used small amounts of Rico Essentials Cotton DK and a 3.5mm hook. My square measures 11.5 cm (4.5") but the size will vary depending on the yarn and hook you use.

Some general notes:

For this pattern I use US crochet terms. We’ll need the following stitches: chain stitch (ch), slip stitch (sl st), single crochet (sc), half double crochet (hdc), double crochet (dc), treble (tr), and spike single crochet (or "long" sc). The spike sc's are explained below, please use the pictures as a help, too.

I did NOT write down the chains at the beginning of each round: for the first stitch in every round, work chains (e.g. 3 chains for the first dc) OR start with a “standing stitch” i.e. join the new color with a slip knot or a simple loop ON YOUR HOOK and just work the first sc or dc as usual. Join rounds with a sl st.

1st Round: start with a magic ring and work *2dc, ch-1* eight times inside the ring (8 dc-2 groups, 16 dc's). (Tip: Alternatively you can work dc-2-togs instead of the dc-2 groups)


2nd Round: with a new color work *3dc, ch-1* in each ch1-space around (8x3 dc's)


3rd Round: with a new color work *2dc, ch-2, 2dc* in every ch1-space (8 shells)


4th Round: work 7 dc's in every ch2-space around. (56 dc's, no ch-spaces!) (Tip: I like this motif best, when the 3rd and 4th round are worked in the same color)


5th Round: with a new color work sc's in every dc around, with spike-sc's between the shells of the 3rd round. (For the spike-sc (or "long" sc), insert your hook into the little space between the shells of round 3, pull up a loop to the height of your current working round, yarn over and pull through the two loops on your hook.)


In the 6th Round we have to square the flower: join your new color with a standing hdc (or ch-2) in any spike-sc. Then work *sc's into the next 4 sc's, 1 hdc into the next sc, dc's into the next 2 sc's, (1tr, ch-3, 1tr) into the next spike-sc, dc's into the next 2 sc's, 1 hdc into the next sc, sc's into the next 4 sc's, 1 hdc into the next spike-sc* and repeat around (omitting the last hdc) until the end of the round.


7th Round: work dc's in every stitch around, with *2dc, ch-2, 2dc* in the corner-spaces of the previous round. Fasten off, weave in the ends, and you're done!!


If you've got any questions, or find errors in this pattern, please let me know!

I'd also like to see your finished African Flower Squares or projects made with them, so feel free to leave a comment with a link to your blog or flickr picture :)

Enjoy!!

Want to see more African Flower Squares? Check out the Project Gallery on Ravelry!


Related Posts Plugin for WordPress, Blogger...