Thursday, September 29, 2011

A Blanket with a History

Good morning everybody, I hope you enjoy this post as much as I do, I was really looking forward to this - I've made a little something last week-end, look:


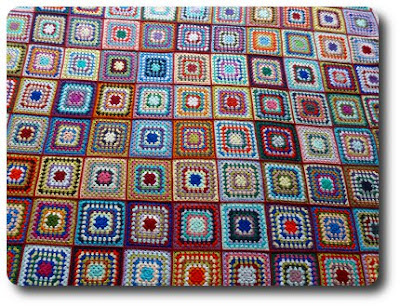
Naaaah... just joking :) What you see here is a huuuuge granny blanket I've made around 1996, when I was sixteen or seventeen.


I've been wanting to show you this blanket for a long time and wonder why it took me so long. Unfortunately I remember little of the actual working process or how long it took to finish it - it looks like a very time consuming project, but on the other hand I still went to school and had lots of time in the afternoons, so I guess it was done quite quickly (I can be a maniac when I start doing something I really enjoy).


As you can see, it's just the simple basic granny square pattern. I've first seen this pattern on the backside of a wiggly cushion from my grandma. I've also seen granny blankets on TV, do you remember the one that Roseanne had in her living-room? I think it was Roseanne's blanket that inspired me to make my own. Thank god for the wonderful crochet-blogs we have today, nowadays Sitcoms simply aren't as stylish as they used to be... :)


When I started this blanket, I must have been in my Seventies mood (thanks to ABBA and the German "Schlager"-Revival) and wanted to work with as many colors as possible. First, I used up all the left-over yarn my Mom had in her stash. Then we've asked neighbours, friends and relatives for more. At some point I had to start buying yarn, and I needed a lot - the blanket is made with 144 granny squares and measures more than 200 x 200 cm (~ 80 x 80 inches).


You probably know this feeling of anticipation, when you're working on a blanket and can't wait to use it every day. With this blanket it's different: I'm showing you these pictures, not dreaming of the days to come, but remembering what has been - this blanket definitely has its history already!


I remember my sister and me coming home from watching the local Icehockey games on Saturdays and snuggeling up under this blanket, warming our frozen bodies. I also remember us watching the early-morning formula 1 races under this blanket (we used to call it "lucky blanket") - I was a huge fan of Jacques Villeneuve and even made some squares in the same colors as the colors of his helmet. Sounds a bit nerdy, but hey: I was a teenager! :) I crawled under this blanket alone in my teenager-room and took it with me, when I moved upstairs in my own appartment. Every year around christmas my girlfriends and I make ourselves comfortable under this blanket when we watch the "Lord of the Rings"-Trilogy. I remember lying under this blanket when I was sick, or crying my eyes out when I had a heartache. The most recent memories are cuddling up with John under this blanket on the sofa in our living-room :)


I've been using this blanket almost every day since I've made it, it's always lying on the sofa (and sometimes in the washing machine). Somehow it's an odd feeling to know that this blanket has to make way for the new blanket, soon. Now don't be silly girl, it's just an old blanket! Or isn't it...?


Tuesday, September 27, 2011

Birthday Potholders


I know, I know - potholders for your Mom's birthday, how uninspired is that? But don't worry, I've got something else for her. I've bought her a gift certificate from her favorite clothing store, because she told me she wanted to buy some new stuff for the coming fall.

Unfortunately I remembered too late that something handmade would be nice, my Mom's very fond of everything I've crocheted recently. Her birthday is tomorrow, so I needed something quick and easy that looked nice, and potholders were the first thing that popped up in my mind. I think it's okay, because my Mom has always liked crocheted potholders (I've never seen non-crocheted ones in her kitchen) - and she really uses them, they're not just a nice wall decoration! :)

Anyway, on Saturday I've searched on ravelry for free patterns and found Jennifer Martin's Flower Potholders. Isn't it a lovely pattern? It was so easy to make, although I worried a little that the backsides might look ugly, but actually they don't.

Here's the pink one with a blue backside:


... and here's the green one with a violet backside:


I had to adjust the pattern a little, because as usual I was working with a thinner yarn and had to add some rounds to get the right size. I think I might use this pattern again, I really like them and I'm sure my Mom will, too.

Hope to see you soon, I'm really looking forward to my next post (because I already know what it's about) :)

Friday, September 23, 2011

Magic Blanket Ride: Chapter 4

I'm back today with news from the Magic Blanket Ride:


Actually there aren't lots of news, because after a break of several weeks I've just come back to it last week-end and didn't have much time for it because I had a busy week of highs and lows. (If you're not interested in my non-crochet life, just skip the next two paragraphs) :)

My lows were mainly work-related: I've been on emergency duty for the past seven days and had lots of calls and duties after work, even on Saturday and Sunday. I'm working in the warehouse of a medical company, and if there's an emergency outside business hours we have to ship the products (the life-saving ones) via taxi or train. This week I also had a call from an angry customer who started to insult the company and me, after he found out that I couldn't help him and that there was nobobdy else available in the evenings - after that call I was so excited and upset, that I accidently dropped the emergency cell phone into the cleaning bucket full of dirty water next to me - unfortunately thankfully the cell phone had no severe damage and still worked after all. :)

The positive highlight of my week (maybe even year): we have finally booked our "summer" vacation for November!! Together with two good friends, John and I will fly to Egypt for two weeks - the first week we'll be on a cruise on the Nile, visiting the pyramids and temples, and the second week we'll be relaxing in a hotel at the Read Sea, with temperatures of about 27 °C (~ 80 °F). JOY!!

But now back to the Magic Blanket Ride. I think I'm gonna show you more pictures of details, and save the full-size photos until it's finished - otherwise it's like reading a book and already knowing the end (and who likes THAT? *gg*). Maybe some of you would like to know more about double-ended crochet, so here are some step-by-step pictures:

Working from the right to the left, I'm picking up stitches with grey (just like working "unfinished" single crochet stitches):

At the end of the row, I turn the blanket, slide the loops to the other hook at the opposite end of the cable, and start working off the stitches - from the left to the right - with white:

When I've got only one loop left on my hook, I do NOT turn the blanket. I continue with white, picking up stitches again (just like step 1):

You already know what's coming: at the end of the row I turn, slide the stitches to the opposite end, and work them off with grey (just like step 2):

You see, it's actually just two rows I'm repeating over and over and over again. Here's a picture of the blanket when I've got all the stitches on my hooks:


And on the next one you see the same edge when the stitches are worked off:

Before this post gets even longer, here's the summary:

Intermediate Statistics:

Width: 150cm (~59 in) (nothing's changed)
Length: 104cm (~41 in)
Colored Stripes: 21
Yarn Usage (basic colors): 11 balls of grey + 8 balls of white
Days actually worked on the blanket: 33 (I took the whole month of August and most of September off)

I hope the next week I'll have more time for crocheting and blogging. Have a wonderful week-end everybody!


Sunday, September 18, 2011

New Design, New Poll, New Button!

Today I was in the mood for a little makeover - and since the hairdresser is no option on a Sunday, it was the layout of my blog that got a new styling. I think it looks friendlier now than before, what do you think?

I've also added some new tabs just below the header and started the poll for the next theme-party. This time the new topic is "Baby Crochet": clothes, blankies, toys etc. I've already had this theme in mind a few weeks ago, and now I thought I'd just put it on the list.

Talking about theme-parties: Wow, you've already added wonderful links, thank you! And don't be shy, just stay a little longer and add more links if you've made more flowers!

And look what I've also made today:


This button is optional, so please don't feel compelled to take it! I just know that some of you have buttons on their blogs, so if you like this one, please feel free to take it, but it's also okay if you don't :)

Have a nice sunday evening everyone and a great new week!

Friday, September 16, 2011

Theme Party # 2: Flowers

Welcome to our link-party in September! For this month's theme party you've voted for the "Flower" topic, and I'm so looking forward to the wonderful crochet flowers you're gonna link up here!


Some things you should keep in mind:
What you see is what you get: please link to the specific post where your chosen project can be found (not just your main blog address), and make sure that your post is about crochet and matches the given theme! No shops! Please understand that I might remove links that ignore these points.
Feel free to post as many links as you like - you should really search in the depths of your archives to retrieve your forgotten treasures, this is your chance to bring them back to the surface! :)

When this collection is closed, you'll have the chance to vote for the topic of the next theme party in October! If you've got suggestions for more topics, please post them here :)

This collection can be found at The Crochet Boulevard now!

Wednesday, September 14, 2011

Wiggly Cushion - finally finished!

To all of you who have wondered what ever happened to my wiggly cushion: it's finished at last! Look:

You might think that I have been really lazy because it took so long, but I swear: I've been working on it ever since I've started it, but at times it seemed there was no end in sight. When the rounds got bigger, I really thought it would take forever! I've worked the ruffles with a rather thin cotton yarn (Catania) and a 2.5mm hook, so I had to add round after round before it had the size to fit the little (!) IKEA cushion. I LOVE close-ups:

All in all I'm quite happy with it: this is my first wiggly cushion that has exactly the same structure that my Grandma's cushions used to have, and it's not so... sloppy like the ones I've made before. But: I think it will take a while before I'll make another one, it's been a little too much effort for such a little cushion :)

With a front side like this, I wanted to have a simple back side and turned a striped pattern that I've seen on Petite Fee into a Granny Square:


Today I've discovered that I'm in very good company: Angie from Le Monde de Sucrette has used the same pattern for her Mosaic Cushion. It looks great with the colors she has chosen and you can also find the pattern on her site!


A few more words about wiggly crochet: First of all, thank you so much for the positive feedback on my Tutorial Part 1 and Part 2. I love reading your comments, they really make my day! (If this is your first visit to k-town and you like this cushion, please check out the tutorial and learn how to make your own wiggly cushion)

For those of you who'd like to see more wiggly crochet, here are some links I've found recently:

Bianca has posted a german tutorial on her blog "Haekelnerd". You'll find lots of pictures of her wiggly pattern that can be used for making a potholder or even a purse.

On Say-very Sweet Things there's an english tutorial for a wiggly square and Lindevrouw has translated this pattern into dutch and used it for a lovely cushion.

Ninu and Saritha have joined a Ravelry CAL (I don't know if it's been the same one) and showed pictures of their wiggly crochet on their blogs, check it out to get inspired!

That's all for today, I wish you all a happy and wiggly wednesday! :)


Friday, September 9, 2011

Wiggly Tutorial (2)

Tutorial: Wiggly Crochet K-Town-Style
(Part 2 - Hotpad/Cushion Pattern)


Please note: This is a free pattern for your personal use. If you'd like to share this tutorial (or parts of it, like the pictures or graphic patterns), please link back to made-in-k-town. Thank you!

Welcome back to Part 2 of my Wiggly Crochet Tutorial. In Part 1 I’ve showed you some basics: the foundation mesh, some pattern examples and two alternative ways to add the ruffles. Today I'll show you the easiest way to do the following pattern and adjust it to the right size you want for your finished project:


Of course, we could just start with the foundation mesh. However, there are some problems when you complete the whole mesh first, and then start with the pattern: First, you need to do a whole lot of analyzing, calculating and measuring until you know the number of empty squares you’ll need in your mesh so that you won’t have any problems with your pattern and the desired size of your finished work. And the “desired size” is the biggest problem: When starting with the whole foundation mesh first, my cushion covers never seemed to have the size I had planned before – my theory is that the mesh stretches a little when you squeeze so many stitches in, so in the end your finished item is probably larger than you’ve actually wanted.
That’s why I start my mesh in the middle, continue in rounds and break off after a while to start with the ruffles. This way I can control the size of my work and stop when it’s large enough.

For this tutorial I work my mesh with a thin tread and a 1.25mm hook, and the ruffles with a cotton yarn (Catania) and a 2.5mm hook. If you prefer working with a thicker yarn, no problem: just pick a slightly thinner yarn and hook for the mesh and everything will be alright.

Let’s go, here’s a graphic pattern:


Begin with ch12, join with a slst to form a ring. Please note for the following rounds: Always work your dc into the specific indicated chain and not just inside the foundation ring!

Rnd 1: ch5 (counts as 1dc and ch2), skip 2 chains of your foundation ring and work a dc into the 3rd chain of your ring. Ch5 (that’s your corner) and work another dc into the same chain as before. Ch2, skip 2 ch and work a dc into the 6th ch of your ring. Ch5 (corner) and work another dc into the same chain as before. Ch2, skip 2 ch and work a dc into the 9th ch of your ring. Ch5 and work 1 dc into the same chain as before. Ch2, skip 2 ch, 1 dc into the last chain of your ring. Ch 5 and join with a slst to third chain of ch5.


Rnd 2: ch5 (counts as 1dc and ch2) and work 1dc into the dc of the previous round. Ch2 and work 1dc into the middle chain of the ch5 (corner) of the previous round. Ch5 and work another dc into the same chain as before. Continue this way and join with a slst to third chain of ch5.

Continue this pattern until your mesh has got the desired size. Again: make sure you always work your dc into the specific indicated chain and not just inside the ch5-space!!

When you’ve completed five rounds you should have a mesh with 11x11 squares looking like this:

Don’t worry if your mesh doesn’t look super-neat, you won’t see much of it later anyway! By now we could start with the first three “wiggly” rounds of our pattern, shall we? Secure the last loop of your mesh (don’t fasten off!), pick the yarn you’ve chosen for the ruffles, and just work your dc4-groups around the posts/bars with your favorite method (A or B, see Tutorial Part 1). If you have a close look at the sketch, you see that there are always “naked” bars between the ruffles, make sure you always leave those bars/posts naked while you’re working the pattern! I’ve marked our first rounds green:


I’m using method B (counter-clockwise, the right side of the dc’s facing inwards), so mine looks like this now:


It’s important that your mesh has always got one round more than you would actually need for the pattern: this makes it easier to continue the mesh later! Here’s a picture from the backside where you can see the extra-round better:


My patch is still tiny (not even a small coaster size), how about yours? I think I’ll add four more rounds of mesh, enough to make two more rounds of ruffles…


On this picture it’s clearly visible how the mesh stretches where I’ve worked the ruffles. It’s still a bit too small for a hotpad, but nevertheless I’ll leave it with this size and start the side rows of the pattern. Perhaps by now you’ve noticed how long it takes and how much yarn you need to make a whole round of ruffles – so better think twice before you make a cushion:


Mine took ages (but I think this was mainly due to the rather thin yarn I’ve used). If yours is still too small, just keep adding rounds of mesh and rounds of ruffles, the pattern is very easy to adjust, look:

 (the thick black line is the original border)

The easiest way to adjust (or design) a more elaborate pattern is to take a piece of graph paper and outline the pattern.

Now back to this one. If you’ve got your perfect size, let’s start with the side rows:


I attach my yarn at starting point B and work “downstairs” along the green bars to point A (if you use method A, just do it the other way round). At the end of the row, fasten off and start the next row. I’m finished now, it looks like this:


I’ve decided to work the side rows with white only, but of course you could change the color with every row, just like I’ve done in the middle.
For the edge I used the same yarn as for the ruffles, and just added a row of hdc’s and finished with a row of reverse sc’s. And here’s my finished little hotpad:


Congratulations to anyone who's read this long, long story until the end. I hope you liked my Tutorial and enjoy wiggling... :)

Thursday, September 8, 2011

The Versatile Blogger Award

Oooooooh, I'm really excited today, because Debi from Dly's Hooks And Yarns has passed the Versatile Blogger Award on to me!


I really feel honored, because I always enjoy visiting Debi's blog and I admire her as a crocheter, blogger and person likewise. Thank you Debi and Congratulations again on winning this award!

And now the obligatory little facts about me:

(1) Now and then I wished I had a dog - I'd like to have a Golden Retriever and I'd call him "Snickers"
(2) Sometimes John calls me "Funny Face" but he won't tell me why
(3) As a teenager, I was madly in love with MacGyver... ;)
(4) I'm one of those people who always read the last pages of a book long before the end
(5) Some years ago, I was able to recognize every ABBA-song in less than a second (and spent hours practizing it)
(6) I don't like people who look down on others, because they regard themselves as superior
(7) I hate this "Women and Shoes"-cliché, and especially novels, movies or tv-series that overdo it (needless to say: "Sex and the City" has always been my arch enemy) :)

And now I have the wonderful duty to pass this award on to some of my favorite blogs - it's always a pleasure to read about their crochet (and other) adventures and look at their lovely pictures. Thank you for entertaining us! Here we go, I'd like to give the Versatile Blogger Award to


Dear girls :), if you'd like to accept this award please take it to your blog and pass it on - if you're not collecting awards, just understand it as a compliment on your work! :)


Sunday, September 4, 2011

Wiggly Tutorial (1)

 
Tutorial: Wiggly Crochet K-Town-Style
(Part 1 - The Basics)


Please note: If you'd like to share this tutorial (or parts of it, like the pictures or graphic patterns), please link back to made-in-k-town. Thank you!

Thanks for all your lovely comments about my wiggly cushion! Your enthusiasm really made me wanna write a damn good tutorial - at least I've tried my best :) This post turned out a little bit longer than I had usually planned, so today we start with Part 1 and I'll post Part 2 in a few days.

Let’s start with some basics. Usually you start with a foundation mesh that should look like this, just bigger (this is just a little patch):

For the mesh you keep repeating *1dc, ch2* in every row, just like in filet crochet with empty squares only. Here’s the graphic pattern for my little patch:


 Then you usually need a pattern that could look like this:

or this


The thin black lines symbolize your mesh, the thick colored lines indicate the bars/posts where you have to place your stitches. The stitches are usually groups of double crochet stitches: I like to work with 4dc-groups, but I’ve also seen patterns with 2dc-groups.

Basically you could use the same yarn for the dc’s as you used for your mesh, but I prefer making my mesh with a thinner yarn (or even thread) and then work the dc’s with a thicker yarn. This makes the whole structure look denser and the ruffles more pronounced.
There are actually two alternative ways to work your dc-groups into your mesh and your pattern will look a little bit different depending on which method you use (an amazing fact that I’ve just discovered when I started making this tutorial)!

Let’s start with Method A (clockwise):


Attach your yarn at the indicated starting point with a slip stitch (slst), work ch3 (they replace the first dc) and 3 dc around the same bar.

(it’s easier when you fold the mesh while working your stitches!)


Next, make a right turn and work 4dc around the next bar “just around the corner” (the second green bar in the pattern above). Please note: In both methods there are no chain stitches between the dc-groups! Follow the pattern (the pink lines) clockwise until you’ve reached your starting point and join with a slst. Your pattern should look like this, the right side of your dc’s should face outwards and the ruffles should fold a little towards the outside:


Method B (counter-clockwise) is my preferred way of working:

Notice the difference? Again, attach your yarn at the indicated starting point with a slst, and work your ch3 + 3dc around the first green bar. This time, make a left turn and work 4dc around the next green bar. Now follow the pink lines counter-clockwise until you’ve reached your starting point and join with a slst. This time, your pattern should look like this, the right side of your dc’s should face the center of the mesh, and the ruffles should stand up a little bit more:
 

The difference between the two methods might not be clearly visible on the pictures. Maybe you should just grab your hook and try both alternatives on two different meshes and then decide which look you like better.

These were the basics of wiggly crochet. In the next part of the tutorial I'll show you an alternative way of working your mesh (i.e. starting the mesh in the middle and working in rounds). This helps you to control the size of your work and makes it easier to follow (or adjust) a pattern. We'll combine this method with the pattern I used for my cushion, and you can decide if you want to make a cushion also, or leave it with a hotpad - I think I'll stay with the hotpad this time :)

Hope to see you back for the second part! :)
Related Posts Plugin for WordPress, Blogger...