Pattern: Made in K-Town by Barbara
The stitch-pattern is based on the Fantasy Shawl, a free vintage pattern.
The adaption as a multi-colored baby blanket including border is my original design.
Please respect my rights as designer:
The adaption as a multi-colored baby blanket including border is my original design.
Please respect my rights as designer:
do not sell, share, translate, or publish any parts of this pattern (including pictures)
online or elsewhere without my permission.
online or elsewhere without my permission.
Do not claim this pattern as your own.
Feel free to sell the finished items you’ve made from my pattern!
If you do, a link-back to my blog www.made-in-k-town.blogspot.de would be great.
Feel free to sell the finished items you’ve made from my pattern!
If you do, a link-back to my blog www.made-in-k-town.blogspot.de would be great.
Thank you!
Pattern Notes and Special Stitches:
For this pattern I use US crochet terms. From the basic stitches we’ll only need the chain stitch (ch), slip stitch (sl st) and the double crochet (dc), plus some Special Stitches:
Star Stitch: will be explained in the pattern
Double crochet 2 together (dc-2-tog): yarn over (yo), insert hook into first indicated stitch, yo and pull up a loop, yo and pull through 2 loops on hook, yo and insert hook into the next indicated stitch, yo and pull up a loop, yo and pull through 2 loops on hook, yo and pull through the remaining loops on hook.
Double crochet 3 together (dc-3-tog): yo and insert hook into first indicated stitch, yo and pull up a loop, yo and pull through 2 loops on hook, *yo and insert hook into the next indicated stitch, yo and pull up a loop, yo and pull through 2 loops on hook*, repeat from * one more time, yo and pull through the remaining loops on hook.
crossed double crochet (crossed dc): will be explained in the pattern
double single crochet (dsc), sometimes also known as “mini bean stitch”: insert hook into indicated stitch or space, yo, pull up a loop (2 loops on hook), yo, insert hook into the same space again, yo, pull up a loop (4 loops on hook), yo, pull through all 4 loops on your hook.
How to use and change colors:
I’ve worked the first two rows, every following star-stitch row (repetitions of row 2), and the last row (the last repetition of row 3) in Cream (the main color) and every dc-row (repetitions of row 3), except for the last row, in a different color. You could also do it the other way round, i.e. working the star-stitch rows in different colors, and the dc-rows in the main color. When changing colors at the end of the row, you already use the new color to finish the stitch, i.e. at the end of the star-stitch row, you already pull through the five loops on your hook with the new color and work the following ch in the new color as well. At the end of a dc row, you finish the dc (pull through two loops) with the new color. When you drop a color, cut the thread and leave a tail – we’ll work over the tails when we come to the border. (Tip: before I work over the tails, I knot the tails together that are right next to each other)


Before we start with the border, you might want to pick your favorite side of the blanket. The sides look a bit different, so you start the border with your favorite side facing you. I’ve picked the side with the right side of the star-stitches facing (right picture)


Rnd 3:
We’re almost there! Sl st into next ch-1-space, ch-1 (doesn’t count as a stitch), dsc into same space, ch-1. For the dsc – or “mini-bean-stitch” – see pattern notes above. (Dsc, ch-1) into the next space, (dsc, ch-2, dsc) into the next space – this is your corner, see the following sketch:


Continue with (dsc, ch-1) in every ch-1 space around, with (dsc, ch-2, dsc) in the according spaces of the remaining corners. Join with a sl st to first dc, fasten off, and weave in all the ends. And that's it! :)


Material and Size:
I’ve worked with Stylecraft Special DK in the following colors: Cream, Lemon, Apricot, Clematis, Sherbet, and Spring Green. Using a 4.0mm hook, my blanket measures 85cmx70cm (33.5”x27.5”). The pattern is easily adjustable to any desired size, so you can use your favorite yarn and hook without problems.
I’ve worked with Stylecraft Special DK in the following colors: Cream, Lemon, Apricot, Clematis, Sherbet, and Spring Green. Using a 4.0mm hook, my blanket measures 85cmx70cm (33.5”x27.5”). The pattern is easily adjustable to any desired size, so you can use your favorite yarn and hook without problems.
Pattern Notes and Special Stitches:
For this pattern I use US crochet terms. From the basic stitches we’ll only need the chain stitch (ch), slip stitch (sl st) and the double crochet (dc), plus some Special Stitches:
Star Stitch: will be explained in the pattern
Double crochet 2 together (dc-2-tog): yarn over (yo), insert hook into first indicated stitch, yo and pull up a loop, yo and pull through 2 loops on hook, yo and insert hook into the next indicated stitch, yo and pull up a loop, yo and pull through 2 loops on hook, yo and pull through the remaining loops on hook.
Double crochet 3 together (dc-3-tog): yo and insert hook into first indicated stitch, yo and pull up a loop, yo and pull through 2 loops on hook, *yo and insert hook into the next indicated stitch, yo and pull up a loop, yo and pull through 2 loops on hook*, repeat from * one more time, yo and pull through the remaining loops on hook.
crossed double crochet (crossed dc): will be explained in the pattern
double single crochet (dsc), sometimes also known as “mini bean stitch”: insert hook into indicated stitch or space, yo, pull up a loop (2 loops on hook), yo, insert hook into the same space again, yo, pull up a loop (4 loops on hook), yo, pull through all 4 loops on your hook.
How to use and change colors:
I’ve worked the first two rows, every following star-stitch row (repetitions of row 2), and the last row (the last repetition of row 3) in Cream (the main color) and every dc-row (repetitions of row 3), except for the last row, in a different color. You could also do it the other way round, i.e. working the star-stitch rows in different colors, and the dc-rows in the main color. When changing colors at the end of the row, you already use the new color to finish the stitch, i.e. at the end of the star-stitch row, you already pull through the five loops on your hook with the new color and work the following ch in the new color as well. At the end of a dc row, you finish the dc (pull through two loops) with the new color. When you drop a color, cut the thread and leave a tail – we’ll work over the tails when we come to the border. (Tip: before I work over the tails, I knot the tails together that are right next to each other)

Note:
Although the pattern is pretty easy to do, I had some troubles explaining it in words (especially the border), so I made an extra swatch and took pictures of the progress to help you with my instructions. You can click on the pictures to enlarge them.
Although the pattern is pretty easy to do, I had some troubles explaining it in words (especially the border), so I made an extra swatch and took pictures of the progress to help you with my instructions. You can click on the pictures to enlarge them.
Pattern:
Row 1
Ch-131 (or any odd number of chains as needed for desired width), dc in 5th ch from hook, *ch-1, skip 1 ch, dc in the next ch*, repeat from * across, working the last dc into the first ch from beginning, ch-2 and turn.
Ch-131 (or any odd number of chains as needed for desired width), dc in 5th ch from hook, *ch-1, skip 1 ch, dc in the next ch*, repeat from * across, working the last dc into the first ch from beginning, ch-2 and turn.

Row 2
Note: the expression “pull up loop (pull up lp)” means: insert your hook into indicated stitch or space, yarn over (yo), and pull through the stitch/space.
Pull up lp in second ch from hook, pull up lp in first dc, pull up loop in first ch-1 space, pull up loop in next dc, yarn over (yo) and pull through all 5 loops on hook, ch-1 (The chain is often referred to as the “eye of the star”). *Pull up lp in the ch just made, pull up lp in the same dc, pull up lp in the next ch-1 space, pull up lp in the next dc, yo and pull through all 5 lps on hook, ch-1 (star-stitch made)*, repeat from * across, working your last star-stitch like this: pull up lp in the ch just made, pull up lp in the same dc (that’s the last regular dc in the row), pull up lp under the next ch (= turning chains from the start of the last row), pull up lp in the next ch (that’s the next of the turning chains, see picture), yo with a new color and pull through all 5 lps on hook, ch-1 to close the star stitch, ch-3 and turn.
Note: the expression “pull up loop (pull up lp)” means: insert your hook into indicated stitch or space, yarn over (yo), and pull through the stitch/space.
Pull up lp in second ch from hook, pull up lp in first dc, pull up loop in first ch-1 space, pull up loop in next dc, yarn over (yo) and pull through all 5 loops on hook, ch-1 (The chain is often referred to as the “eye of the star”). *Pull up lp in the ch just made, pull up lp in the same dc, pull up lp in the next ch-1 space, pull up lp in the next dc, yo and pull through all 5 lps on hook, ch-1 (star-stitch made)*, repeat from * across, working your last star-stitch like this: pull up lp in the ch just made, pull up lp in the same dc (that’s the last regular dc in the row), pull up lp under the next ch (= turning chains from the start of the last row), pull up lp in the next ch (that’s the next of the turning chains, see picture), yo with a new color and pull through all 5 lps on hook, ch-1 to close the star stitch, ch-3 and turn.

Row 3
Dc into the eye of the next star-stitch, *ch-1, dc into the eye of the next star-stitch*, repeat from * across, working your last dc into the turning chain (the one, where you’ve already pulled up a loop in the previous row, see picture). Finish the last dc (i.e. pull through 2 lps) with the main color, ch-2, and turn.
Dc into the eye of the next star-stitch, *ch-1, dc into the eye of the next star-stitch*, repeat from * across, working your last dc into the turning chain (the one, where you’ve already pulled up a loop in the previous row, see picture). Finish the last dc (i.e. pull through 2 lps) with the main color, ch-2, and turn.

Row 4 - end:
Repeat rows 2 and 3 until your blanket has the desired height. For the last repetition of row 3, use your main color.
A word about turning chains: experienced crocheters might wonder, why I started row 1 with a dc in the 5th chain from the hook instead of the 6th, and why I use 3 turning chains instead of 4 at the end of row 2. Actually, you would expect 4 turning chains, to count as the dc and ch-1 we need, and the original pattern for the Fantasy Shawl does indeed suggest 4 turning chains. However, I’ve tried it like this, and found that after a few rows the edges started to widen and make a bend. Working with 3 turning chains like I do here, we end up with nice, straight edges. I guess you just have to trust me here :)
Border:
A word about turning chains: experienced crocheters might wonder, why I started row 1 with a dc in the 5th chain from the hook instead of the 6th, and why I use 3 turning chains instead of 4 at the end of row 2. Actually, you would expect 4 turning chains, to count as the dc and ch-1 we need, and the original pattern for the Fantasy Shawl does indeed suggest 4 turning chains. However, I’ve tried it like this, and found that after a few rows the edges started to widen and make a bend. Working with 3 turning chains like I do here, we end up with nice, straight edges. I guess you just have to trust me here :)
Border:
Before we start with the border, you might want to pick your favorite side of the blanket. The sides look a bit different, so you start the border with your favorite side facing you. I’ve picked the side with the right side of the star-stitches facing (right picture)


Rnd 1:
The first row of the border is a round of dc with 3 dc into the corner-stitches. Make it like this:
Top Edge:
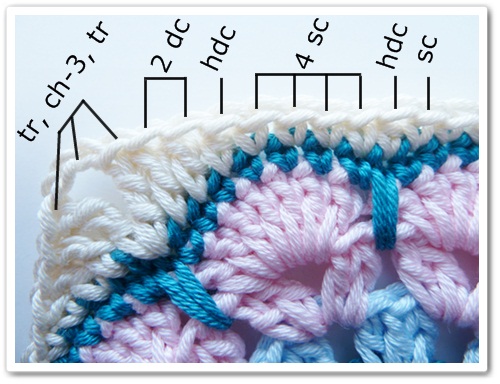
Continue with (or attach) your main color in the right corner, ch-3 (counts as dc) and 2 more dc into the same stitch (that’s your first corner), then make a dc in every ch-1 space and in every dc across. For the next round to work out, it’s important that we have an even number of dc on the edges (not counting the 3 corner dc on both ends), so you have two options: either you squeeze in an additional dc somewhere, or you work a dc-2-tog over a ch-1 space and the following dc (that is what I did, see picture). Make 3 dc into the corner-stitch.
Top Edge:
Continue with (or attach) your main color in the right corner, ch-3 (counts as dc) and 2 more dc into the same stitch (that’s your first corner), then make a dc in every ch-1 space and in every dc across. For the next round to work out, it’s important that we have an even number of dc on the edges (not counting the 3 corner dc on both ends), so you have two options: either you squeeze in an additional dc somewhere, or you work a dc-2-tog over a ch-1 space and the following dc (that is what I did, see picture). Make 3 dc into the corner-stitch.

Side Edge 1:
While working down the sides, work your stitches over the tails of the color changes. Place your stitches into the spaces of the dc-rows and into the side of the star-stitches. This is either the eye of the star, or the first turning chain that marked the beginning of the star-stitch row, depending on which side you’re working down first. It will be the other way round, when you’re working the second side.
While working down the sides, work your stitches over the tails of the color changes. Place your stitches into the spaces of the dc-rows and into the side of the star-stitches. This is either the eye of the star, or the first turning chain that marked the beginning of the star-stitch row, depending on which side you’re working down first. It will be the other way round, when you’re working the second side.


Work 2 dc into the first gap, then a dc-3-tog over the same gap, the next star stitch-row and the next gap. *2 dc into the same gap, dc-3-tog over the same gap, the star stitch, and the next gap*, repeat from * across, until the last gap and make your 2 dc in there. Now count your stitches (without the 3 corner dc): if you’ve got an odd number of stitches, make one more dc into the same gap and finish the edge with 3dc into the corner stitch. If you’ve got an even number of stitches, you can work your 3 corner dc right away. (note: with an even number of star-stitch rows, the stitch-count should work out without adjustments: in my example I had four star-stitch rows and an even number of stitches on the edge, see picture)

Bottom Edge:
Make a dc in every ch-1 space and in every dc across (actually you’re working your stitches not into the dc, but into the chain where you’ve made your first-row dc of course). Adjust your stitch-count like you did for the top edge (i.e. by working a dc-increase or a dc-2-tog), and work your 3 dc into the corner stitch.
Make a dc in every ch-1 space and in every dc across (actually you’re working your stitches not into the dc, but into the chain where you’ve made your first-row dc of course). Adjust your stitch-count like you did for the top edge (i.e. by working a dc-increase or a dc-2-tog), and work your 3 dc into the corner stitch.

Side Edge 2:
Same as Side Edge 1, close the round with a slip stitch to beginning ch-3 of the first corner. Don’t turn.
Same as Side Edge 1, close the round with a slip stitch to beginning ch-3 of the first corner. Don’t turn.

(In case you wonder, why I’m working all those dc-3-togs along the sides: I wanted to make a nice dense edge to cover the loose tails completely, but without increasing the stitch count. Alternatively, you could just make 2 dc into each gap and 1 dc into the side of the star-stitch row, if it doesn’t bother you that the tails might be showing.)
Rnd 2:
Rnd 2:
The second border round is worked with crossed dc. If you’ve followed the pattern exactly as described so far, you should be at the ch-3 that counted as your first of 3 corner dc, so we can start with the new corner right away:
Ch-4 (counts as dc and ch-1), and - working behind these turning chains – make a dc into the dc before. That’s your first crossed dc. Dc into the next “free” dc (=the second corner dc), ch-1, crossed dc – working behind the stitch just made – into the the stitch before (=first corner stitch =top of 3 turning chains). Dc into the next free dc (=the third corner dc), ch-1, crossed dc into the stitch before (=second corner dc). Dc into next free dc (= first dc of the top edge), ch-1, crossed dc into the stitch before (=third corner dc). Now that we’ve made our first corner with 2 dc (regular or crossed) coming out of each corner dc of the previous round (see picture), we can go on with the edge: *skip the next free dc, dc into the next dc, ch-1, crossed dc into the skipped dc*, repeat across until you reach the next corner, then continue as described for the first corner, i.e. not skipping stitches between the dc, but working two dc (regular or crossed) into each of the 3 corner dc. Then go on with the crossed dc along the straight edge again. Continue this way until the end of the round and join with a sl st to third ch of turning chains. Do not turn.


Maybe this sketch can help, too:

Rnd 3:
We’re almost there! Sl st into next ch-1-space, ch-1 (doesn’t count as a stitch), dsc into same space, ch-1. For the dsc – or “mini-bean-stitch” – see pattern notes above. (Dsc, ch-1) into the next space, (dsc, ch-2, dsc) into the next space – this is your corner, see the following sketch:

Unfortunately the sketch looks pretty crooked (sorry, I’m not that good at drawing graphic patterns), but in reality the corner ch-1-space (marked light green in the sketch), is right in the corner, right above the middle corner dc of the first border round, you can see it better in the next picture:

Continue with (dsc, ch-1) in every ch-1 space around, with (dsc, ch-2, dsc) in the according spaces of the remaining corners. Join with a sl st to first dc, fasten off, and weave in all the ends. And that's it! :)

I hope that the instructions were not too confusing
and that you’ve enjoyed this pattern!
As usual, you can share your finished project and notes on Ravelry.