Showing posts with label pincushions. Show all posts

Tuesday, June 13, 2017

Window Shopping

Hey there!

It's been a while since my last blog-post (thank you all so much for your comments on my Starlight Baby Blanket, I'm glad you all like the pattern!). Today I thought I'd show you a round-up of things I've made recently to fill the shelves of my new DaWanda-Shop. But don't worry - this is not an attempt to lure you into my shop :) I know that the readers of my blog are more interested in making than buying, so I've included some pattern-links for you!

Although I'm really not a fan of amigurumi (there's far too much attention and concentration required for my taste *gg*) I sometimes stumble upon a pattern that's just too cute to resist, like this clown here:


It's a paid pattern by Mari-Liis Lille from Lilleliis, and I can tell you it's really worth the money! She's got a whole bunch of lovely patterns, so I've also made these cute Cuddly Babies:


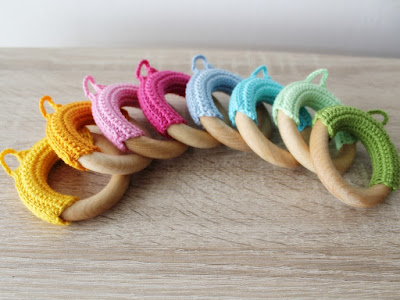
Since both these dolls and my baby-blankets take some time to make, I also wanted to offer some smaller, quicker-to-make items in my shop, and so I've made a selection of baby teethers. Using wooden rings, I sealed them with coconut-oil and simply worked a few rows of single-crochet stitches around half the ring and added a little hanger (just because I thought it looked cute *gg*):


The idea for the other rings I've made is inspired by the Bunny Slope Teethers, a free pattern from Playin' Hooky Designs. To make the strap that is attached to the ring I didn't work in rows like the original pattern suggests, though, but made up a pattern myself that is worked in the round.


And of course, I've made some items that are based on my own patterns, like this set of spiral coasters...


... or some pincushions in different color-combinations.


And just because I've heard on Television that toilet paper covers are SO yesterday, I even made one of those using my latest mandala-pattern - just to prove a point :) Well, the cover still hasn't sold yet, but I'm not losing hope! :)


Last but not least, I felt like making some more crochet covered stones. If you've been following my blog from the start, you know that every once in a while I've made those stones as gifts, and I thought they'd be a nice addition to my shop.


Well, that was mostly it, I hope you've found some inspiration today :) 

Currently I'm working on yet another baby blanket, but it's taking me longer than expected. In the meantime, I thought I'd share with you the pattern (both graphic and written) for the c2c lion blanket I've made recently.


So stay tuned for the next blog post with the free pattern! :)

Have a great and sunny day,


Friday, June 17, 2011

Sunny Pincushion Tutorial

Pattern: Made in K-Town by Barbara

Please respect my rights as designer: do not sell, share, translate, or publish any parts of this pattern (including pictures) online or elsewhere without my permission. Do not claim this pattern as your own. Feel free to sell the finished items you’ve made from my pattern! If you do, a link-back to my blog www.made-in-k-town.blogspot.de would be great.
Thank you! 


Material:

I used 4 different colors of Catania by Schachenmayer and a 2.5mm hook. Make sure you’ll work with a similar yarn and a 2 – 2.5mm hook, otherwise you’ll end up having a monster cushion :) You can use up to 7 different colors if you want to. You’ll also need some fabric and stuffing material for the inner cushion and a little decorative button (optional).

Some General Notes:

For this pattern I use US crochet terms. We’ll need the following stitches: chain stitch (ch), slip stitch (sl st), single crochet (sc), half double crochet (hdc), double crochet (dc), and treble (tr).

I did not write down the chains at the beginning of each round: for the first stitch in every round, work chains (first tr = 4ch; first dc = 3ch; first hdc = 2ch) or, when working with a new color (rounds 2-5), start with a “standing stitch” i.e. join the new color with a slip knot or a simple loop on your hook and just work the first tr/dc/hdc/sc as usual.

Unless otherwise stated, join rounds with a sl st.

I’d be ready to start now, you too? Okay, let’s go:
 
Front Part:

1st Round: Start with a sliding loop (or “magic ring”) and work (2dc, 1ch) 8x inside the loop, fasten off (8 dc2-groups)

2nd Round (new color): work (4dc, 1ch) in every ch1-space, fasten off.

3rd Round (new color): work (1hdc, 1 long hdc, 1hdc, 3ch) in every ch1-space, fasten off. For the long hdc, work a hdc as usual but insert the hook not into the ch1-space, but into the second of the 2dc of the first round and draw up a long loop to the height of your current working round. Your circle might ruffle a bit now (mine does), but don’t worry – this won’t matter in the end.

4th Round (new color): work (6tr, 1ch) in every ch3-space, fasten off.

5th Round (new color): work 1sc in every tr, and 2sc in every ch1-space (64 sc), do not fasten off!

6th Round: work 1sc in every sc without further increasing (64 sc), fasten off, then weave in all the loose ends and sew your button into the middle.

Back Side:

Unfortunately, I’ve got no stitch-by-stitch pattern for the back, because here I work intuitively. The goal is to crochet with sc a circle (flat or slightly cupped) that has exactly the size of the front part and 64 sc in the last round.
I’ll try to guide you through this with some ideas:
Start with a sliding loop and work 6sc inside the loop. As a rough rule of thumb, you have to increase 6 sc per round in the beginning.

Later (After the fifth round is good, there you should have 30 sc) you should go down to 5 increases per round, and after a while to 4 or only 3 or 2 increases per round – you should frequently count the number of your stitches and compare the size of your circle with the size of your finished front part.

To avoid a hexagon shape, make sure you vary the spot where you increase. You can join the rounds with a sl st, I prefer working a spiral because I don’t like the visible “seam” of the slip stitches. I finish the spiral with a sl st into the next sc.

The Padding:

Take a piece of fabric and cut out two circles the size of your crocheted circles (plus some extra millimeters for the seam).

Sew the fabric circles together (leaving a little gap), turn it inside out, fill it with batting very tight (!) and close the gap


The Finish:

Now it’s time to bring it all together: Join a new color right above the little space between any 6tr-group and crochet your circles (right sides facing out!) together with sc. Half way around, slip in the padding, and go on with sc until the cushion is closed.

For the next round  (the petals), make 1ch, then 1sc into the same stitch, skip 2 or 3 stitches and – without starting chains – work 10 tr (petal) in the stitch right above the middle of the 6tr-group. Skip 2 or 3 stitches and work 1sc above the little gap. Again, skip some stitches and work your next petal (=10tr) above the middle of the next 6tr-group.


Of course there is no exact middle stitch to a group of six, so you have to try which stitch looks best for your petal. Sorry for being a little vague here. Continue this pattern (sc, skip a little, petal, skip a little…) until the end. Fasten off, weave in the ends, et voilà…


Congratulations, you’ve finished your first Sunny Pincushion!


I hope you’ve enjoyed my first tutorial, if you’ve got questions or find any mistakes, please let me know! Of course I’d like to see the pincushions you make, so feel free to write a comment and post the link to your pictures!

Thanks for your visit in K-town,
Barbara

Wednesday, June 8, 2011

The colorful world of pincushions

When I started searching the web for crochet inspiration a few months ago, I quickly became a huge fan of Rachel from Clever Cheshire Cats. Have you checked out her blog yet? Everything she crochets is simply beautiful! My favorites are her little pin cushions and I wanted to make one of them when I first saw them. So, inspired by Rachel and with my own ideas for a round pattern and some decorative embellishment (damn, I love buttons), this is what I've made:


For the stuffing I sew a little cushion and fill it with batting. This is the part I don’t like, because I’m not good at sewing, but this way I know the stuffing won’t pop out through the holes. I work the two sides of the pincushion separately, then I crochet them together (half way through I slip the little sewn cushion in) and in the end I add the petals.


If you take a closer look at the pictures, you’ll see that the pattern vary a little, but I think by now I’ve settled on the pattern I like best.


I also played around with different sizes and shapes, like squares or even a hexagon, but the big round ones are definitely my favorites.


They are so quick and easy to make, and I love working with the colorful Catania yarn. By the way: today I've received an e-mail that my yarn is finally shipped! While waiting for the yarn I’ve already weaved in the ends from the finished squares, so with a clear conscience I can start the next stage of “Mission Baby Blanket”, soon. Hooray!

Looking forward to your next visit here in K-town,

Barbara

Related Posts Plugin for WordPress, Blogger...